I just love glaze firings.
Not the process so much as the results.
It's always with anxiety, that I open the kiln to see
how the load turned out. (Especially when there's a couple of
pieces being fired for someone else.)
Here's a link of all the pieces from this load, (scroll over each
item to read more about it.)
http://www.flickr.com/photos/12928209@N04/4198973856/
The kiln gods must be appeased. If enough of me has gone
into the work, they usually turn out well.
But there's often a piece or two that don't quite work out,
or (as in this case) a lovely piece that gets damaged.
One of my sun faces had a witness cone melt onto it. DAMN!
A small disappointment, that can easily be resolved.
I made some wall scones, for dried flowers, and they turned out very well.
I also made a couple of little bowls with a heart in the middle.
I like the smaller one, and will experiment with the darker one. I'm gonna
touch up the heart a bit & re-fire it.
The lily candleholder is complete & I'm really happy with the way it turned out.
The eyeball is a bit weird, but cool.
Some of the smaller pieces are for jewelry, so they will need to be assembled.
Eventually I'll probably list some of these items in my etsy store:
http://www.etsy.com/shop/smilingbluedog
But if you are interested in something, just contact me: smilingbluedog@yahoo.ca
Saturday, December 19, 2009
Saturday, November 28, 2009
Follow my heart

I'm working on a small group of jewelry pieces
that I hope you'll enjoy.
This is the 1st one.
I call it "follow my heart" because that's what I'm doing.
I love the freedom of making something just for the joy
of making it.
Using earthenware clay, firing it, painting it, then
designing and making it into a unique piece of jewelry has allowed
me to use numerous skills. It's a little wearable work of art.
I hope you like it as much as I do :)
I've just listed it in my Etsy on-line shop.
http://www.etsy.com/view_listing.php?listing_id=35452011
Wednesday, November 11, 2009
Hatching baby dinosaur

I've neglected my blog for some time now.
*wondering if anyone even noticed*.
My excuses?
I've been busy working at my day job, dealing with day to day life,
which keeps me busy, but it's not particularly interesting to write or read
about.
My "spare"time has been spent learning to use my new computer, but I'm
catching on, and have even spent some creative time in my studio again.
That's the stuff I'd like to be writing about.
I thought I'd show-off my newest listing in my etsy shop.
It's a hatching baby dinosaur! I think it's a pterodactyl, (does spelling count?)
I bought the greenware from a ceramic store, a long time ago.
I cleaned, underglazed and fired it promptly (thank goodness), because it's a lot easier
to store bisque than greenware, especially if you end up moving, like we did.
So I glazed the eggshell, and fired it again. Then packed it away in a box with many
other partially completed pieces.
Now that I have my studio space set up, I've been unpacking these boxes and am determined
to complete most, if not all, of my unfinished work.
This baby was a labour of love, and I hope someone will treasure it.
I also have a couple of hatching baby dragons that I need to finish up as well.
They're adorable too.
I find it takes such a long time from start to finish, let alone photographing & listing
on my etsy shop. At least I don't have to worry about them "growing up" in the mean-time.
I'll try & add a photo here, but just in case that doesn't work,
here's the link to my new listing of the hatching baby dinosaur: http://www.etsy.com/view_listing.php?listing_id=34281886
Wednesday, September 16, 2009
A lovely weekend and a new dress.
I can't remember the last time I bought, or even wore a dress,
let alone got excited about one (for myself).
I'm happiest in jeans, or pants of any kind, as long as they have pockets.
But this past weekend I went and splurged on a lovely summer dress (yah, I know
it's almost over). And "No" it wasnt' even on sale.
I guess now I'll need decent shoes or sandals to go with it :)

I love the colors & it's so comfy, but best of all...it has pockets!
That makes all the difference in the world!
To me anyhow.
I bought it from a small, local shop in Balfour, which is on the way to
Queen's bay beach (where we were heading to take Spike for a swim.)
This was one of the loveliest & fun weekends we've had in a while,
so I took lots of pictures.
Have a wonderful day.
Here's a few of my photos...

Spike loves going to the beach, almost as much as
we do :)

Spike and his big stick.

A small flock of Canada Geese

Sunset on Kootenay Lake.
Sunday, September 6, 2009
Time in my studio

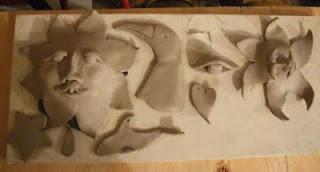
Today I spent a good part of my day working with clay in my studio.


I don't get to do that as often as I'd like, because there's always some other things that
I need to do, like: go to work, do the dishes, feed the dog, make dinner, do the laundry,
get off the computer, or something else that uses up my time.
Anyhow, it was a rainy day today. My favourite weather for working with clay, because
it doesn't dry so fast, and I like to take my time. I wanted to make at least 2 sun faces, and
something to hold all my earrings and whatever else popped up in the process.

I started off with a bucket of left-over clay I had to recondition. (I love using new clay from
the box, but since I had lots of time today, it was a perfect opportunity to dig into the bucket and get dirty.)

Sometimes it's fun to take the slick lumpy clay scraps, and wedge them out into a nice ball .
(It's also hard to take pictures when my hands are covered in clay).

Once it's conditioned enough (doesn't stick to my board or hands) I roll it out onto a board, and make a nice slab. I use an old rolling pin (that never made a pie) to flatten out the clay, draw my sun face outline and then cut it out with a sharp tool!

Once the outline is cut out, I shape little pieces of clay to form the eyes, eyebrows, nose, mouth, then "stick" them on.

I lay the sun face over a round sponge (to support the basic shape), touched up the face,
smoothed and shaped it a bit. Now it's gotta sit overnight so it'll be a bit harder, so I can add the hanger on the back.

I made 3 sun faces and various other simple pieces. The
bird head here is going to be my earring holder.
I'm not sure what the eye is going to be for, but I can never have
enough eyes.
Ok, so it's not a kiln load, but it's a start.
Once these pieces are dry (in a few days), I'll smooth & clean them of dust and
add my initials to the backs, and then they will be ready to fire.
If I do this a few more times, I'll have enough pieces to fill up my "new to me" kiln,
and see how it works.
P.S. ( Hubby was kind enough to barbeque burgers and corn for us, so I didn't have to
make dinner. )
Sunday, May 31, 2009
Doggie days
Well, today Midas has gone "home".
We've been doggie-sitting almost two weeks, for our elderly friend from Kalso.
She fell & broke her hip on May 19 and has just been moved to a 3rd hospital since then.
At least now she is close to her family. I'm sure this will help her recover quicker.
Anyhow, my husband (mostly) and I, have been looking after her year old golden retriever, Midas.
We have our own dog- Spike, he's an 11 yr old akita/border collie cross. He's not used to sharing his home & family, so I was a bit anxious about how it'd work out.
At 1st Spike was pretty grumbly, watching Midas ( who was constantly moving, ) was
tiring him out (us too)! We had to keep Midas in the fenced patio area (Spike's pen) and
put Spike inside the house, at the beginning.
When we tried to bring Midas in the house we learned that he was scared to go up our stairs. So we couldn't get him in the house the 1st couple of days.
One night we were out in the front yard, ( hoping to see the space station pass over us) and I managed to coax Midas up the front stairs, and got him used to them...so now we could bring him inside without a struggle. AND we got to see the space shuttle fly over us!
Anyhow, a couple of nights ago, I set my mind on getting him up the BACK stairs. So armed with a few Marrow bone treats, I tried coaxing & pleading...no luck.
He can be pretty stubborn, but he sure wanted the goodies!
I was determined to get him up the stairs, so I put one treat on each of the top 3 steps, just out of reach. While he was stretching (not taking his back feet of the ground) and trying to reach the nearest one, I slowly lifted his back leg off the ground & put it on the 1st step, then I did the same with his other rear leg. He started shaking & crouching, but I persisted and moved his front paws (one at a time) to the next step. It took a lot of doing, but I eventually manoevered him up four steps, and then he was so close to the top, he grabbed the treats and got onto the porch. So proud of himself!
Here we are 2 days later and he's running up and down the stairs like there was never an issue!
And just like that, he's gone, the long drive to his new home, where his own family will be around. "Mom" and Midas will be reunited in couple of days, to start a new chapter in their lives- "Recovering".
Saturday, March 14, 2009
Coming to terms with clay.
I was wondering how many folks are familiar with some of the basic terminology
used in a mud shop? (other than mudders of course:)
After listing a couple of "slip-cast, bisque ware" pieces on my Etsy store... http://www.etsy.com/view_listing.php?listing_id=20570255
I realized that I was using clay-speak which may not be well understood by everyone.
So I thought it might be a good subject for my blog.
First of all there's numerous names and types of "clay". I've divided them into two categories:
Manmade- polymer clay, fimo, resin, plaster, paper mache, playdough are some examples
of what are often called "clay".
There are so many types of manmade clays. They are great for the novice AND the pro.
The best part is that no special equipment (kiln) is required, so it is accessible to everyone!
Although they can be pricey- the size of your creation will have a big effect on the cost of your materials.
-some come in a block, in assorted colors,
- others are powders that you mix with water.
- you make your item, then let it air dry.
- Some types will harden and be finished,
- others just need to be painted at this point.
- Then (for some types) you must bake it in a (regular household) oven,
(to maintain the permanent shape,) and may or may not need to be
painted or sealed.
Natural clays-
Earthenware, stoneware, porcelain, bone china, Hi-fire, Low-fire, terra-cotta are some examples of natural clays. Most are processed to remove impurities, and to alter the plasticity of the clay.
Here's a link for more great info about natural clay: http://www.kitcornellpottery.com/teaching/clay.html
These clays are all very breakable in the greenware stage, and must be fired to maturity to make them strong and permanent.
Earthware- low-fire opaque clay
Stoneware- Medium to High-fire opaque clay
Porcelain- High fire clay (often somewhat translucent.)
Terms often used for natural clays:
Bisque: Clay that's been fired once, often to maturity. It is strong and ready to be
displayed, but more often is painted (or stained), or can be glazed and then fired again.
Cones: Used to determine maturity of clay as it's being fired. (kind of technical, I'll add a link
here soon)
Firing: Heating clay to maturity, where it is no longer porous. Usually fired in a kiln.
Mudder's don't usually use temperature to describe how it's been fired, we use "cones".
Greenware: Clay that's been shaped into a form and dried.
It is very fragile at this stage. If an item is broken at this stage, it can sometimes
be fixed or more often, pulverized, water added, and re-used.
Leather stage: When clay is partially dry, it is great for carving details and holds it's shape, but is
very breakable.
Mudder: A person that works with clay.
Slip: Liquid clay used to pour into a mould, (also great for fixing broken greenware.)
Slip cast: A piece that was made by pouring slip into a mould, allowing some of the moisture
to be absorbed by the mould, removing piece from mould, allowing it to dry.
Whiteware: Is usually a plaster piece ready for painting, sometimes used "incorrectly" to
describe bisque ware.
Sunday, February 15, 2009
DIY live mousetrap,
At our old house, we had a mouse problem when we moved in,
so I made my own cheap & simple live trap, using a deep (plastic) garbage can, long piece of wood, newspaper, tape, scissors, peanut butter, and (chocolate chip) cookies.
It worked great, I caught 5 mice the 1st night I tried it!
- Lay a sheet of newspaper on top of the garbage can to cover it completely.
- Tape it to the can so it is secure and looks kinda like a drum.
- Then cut a + in the middle of the paper. (The trap entrance). The pointy flaps should be a couple of inches long.
- Smear a bit of peanut butter on each of the 4 tips of the paper.
- Use the piece of wood to form a ramp (lean one end of the piece wood, on top of the garbage can, the other end on the ground,)
- Make a tiny trail of cookie crumbs going up the ramp and leading to the peanut butter. Sprinkle some more crumbs all over the paper.
- Now you just gotta wait! and eat the rest of your cookies.
The idea is the mice will follow the cookie trail onto the paper, when they go for the peanut butter, they fall in and can't get out.
If you are releasing the mice, you have to take them far away,(a couple of miles anyhow) or they'll just come back.
Then I bought a little plug-in mouse deterrant thing.
(It makes a sound we can't hear, but mice can and they don't like it, so they stay away.)
It worked!
Wednesday, February 11, 2009
Mood beads and glow-in-the-dark bead
I've recently discovered mood beads and glass glow-in-the-dark beads
The mood beads change color to match your mood, but it's actually your
body temperature that changes the colors.
The glow-in-the-dark beads are glass, and they glow green (after being
in sunlight, or bright light).
Anyhow, they are fun to play with, so I've made a couple of
neat bracelets with them.
If you want to see them, go here:
http://www.etsy.com/view_listing.php?listing_id=20906473
Sunday, February 1, 2009
Amazing Papercrafts!
I stumbled upon a couple of paper craft sites last night.
There are some AWESOME things you can make.
I just had to try it, so I printed off a couple of paper craft projects,
a parrot, and, get this...
clownfish in an aquarium. http://cp.c-ij.com/en/contents/2023/aquarium-clownfish/index.html
All you need is a printer, scissors, exacto, and glue (maybe a lot
of patience too...I'll let you know).
They have free projects you can download & print.
The 1st one I checked out is from (surprisingly) Yamaha!
There's amazing paper crafts of motorcycles!!
And animals, and more... Here's the link:
http://www.yamaha-motor.co.jp/global/entertainment/papercraft/index.html
The 2nd one is from Canon printers, it's called Creative Park and they had a great selection.
Paper crafts, calendars, cards, they have all kinds of projects!
That's where I found the aquarium...it looks like it may take some time, but
I'm sure it'll be worth it.
http://cp.c-ij.com/en/index.html
I just know there's more sites like these out there. If you have a good one please share!
NOTE: I have always loved paper!
It may be a common item, but there's so much
variety and uses for it that I just haven't explored them all...yet!
I'm inspired to sample this whole new direction, and see where it takes me.
Tuesday, January 27, 2009
It's hard to say goodbye...


I hope I'm not alone...but,
I have a hard time saying good-bye to ... someone/something/?
I don't mean see ya later. I mean real goodbyes, where you know or
believe, you may never meet again.
Something I've never really sat down & thought about , but I am right now. I'll get back to the "why" in a minute.
Just starting to realize that farewells come in all sizes. Most are of
little significance, small, daily, routine.
Others are momentus and are relived, over & over...HUGE!
Then there's that in-between range.
Sometimes you just don't know that the little goodbye was to become
Sometimes you just don't know that the little goodbye was to become
the last one ...
Sometimes you think it's the last one... and it's not! Not even close!
There's so many people and things we part with over the years,
that I guess it's good to keep the "g'byes" in perspective.
I guess that's all I'm trying to do.
Now, back to WHY I'm on the subject.
(sounds almost silly now that I've put it in perspective)
I'm preparing to sell some of my favourite
clay artwork. They're only clay, yes, I know.
I can make another one (I guess).
But there is something special about a First of something.
My 1sts are rarely the best pieces, although they often
take longest to make. I work out problems
(like don't forget to make it hang-able, duh),
refine the design, texture, colors, etc.
I guess that's why I'm so attached to them and what
makes it hard to say good-bye.
But, if I'm serious about being an artist, I can't
keep every original I make. Just have to learn
to say farewell to my favourites.
Besides, these are only little and happy, goodbyes.
May your good-byes be small ones:
Angie
Monday, January 26, 2009
Etsy stuff
I recently joined Etsy (on Nov 1/08. )
I've been making "stuff" for so many years,
and have done craft sales, consignments,
custom orders, but my real joy (like most artists)
is in making things, not in selling them.
A friend of mine suggested that I try selling my hand-made
creations on-line at etsy, so I'm trying it out!
I have a small space in the living room, (an over-flowing corner ,)
where I've been making jewellry. But I need a proper place to work
with clay and paint, etc. ...so...
We are building a studio for me in the garage. At last I will
have a place for all me & my supplies!!! and a workspace !!!! YEAH!!
So, after spending (many) hours looking at all the amazing creations, and reading numerous Profiles, I finally took the plunge and joined, then I listed my 1st items....all 3 of them.
I was thrilled when I made my 1st sale a couple of DAYS later!
It's still my only sale... so far.
It all sounds simple enough, right?
Actually it is, but it all takes time, and I've spent a lot of time,
refining, editing, and refining again.
I thought all I'd need is good items to sell, at a reasonable price,
and that's it......not.
It's just another starting point.
Here's what I've learned...so far:
Before listing an item:
- Start with 5 good photos... can't say enough about that! (any
cropping, editing, etc. resize ( 1000x1000 pixels) So they're
ready to download.
- Get a box the item will be shipped in, take measurements, weigh it
and calculate shipping to various places.
- Go to the etsy workshops! (I'd include a link, but not sure how)
- Get to know people, etsy, blog, facebook, etc.
- Ask for help when you need it. It can save an amazing amount of
time, compared to trial & error.
- Get organized. My current dilemma... I've got a ton of photos on
my computer, and need to figure out a good filing system for them.
I'll add things, as I learn...
Sunday, January 25, 2009
Building my studio- in the garage.


 BEFORE photos:
These garage photos were taken Dec 7/08, after we got the furnace hooked up.
That's when Dave started building my studio. He had just built a dividing wall in the garage, so we have a "His" side, and a "Her" side.
This is where it all started... at the beginning.
Jan 25,2009:
Today was one of those lovely, sunny (rare) days, in the Kootenays.
It was great! Dave & I worked on my art studio, all day!
Although we were inside... in the dusty, dirty, garage all day,
we got a lot done.
Dave got the last wall insulated, plastic covered, & plywood covered!
I got it primed, and will paint it tomorrow.
It may not sound like much, but with Dave's back problems,
I'm grateful for productive days like this.
I've been needing my own studio space for many, many years.
Gradually, I've taken-over almost 1/2 the living room, with my
art supplies and projects. (Plus the spare room, and there's clay,
glazes & finished pieces stored in the basement).
It will be so wonderful to have a place for all my "stuff", and
a place to create.
Note: I'll try a different layout next time. Can't figure out how to
do that right now.... please bear with me as I deal with the
learning curve.
Saturday, January 24, 2009
My blog begins...
Here's my 1st blog - don't know if anyone will actually find,
see or read it... let alone, comment on it.
If you DO know me In Real Life, then I don't have to tell you my life story
(thank goodness).
If you don't know me IRL, well... what can I say?
You may have to check out some of my links and read a bit,
or contact me :)
Meanwhile, I will just talk to myself here and get used to the concept
of keeping an on-line presence, and hope I don't embarass myself.
Who knows? Maybe I'll think of something so exceptional that everyone will want to read it. ;)
DO NOT SEND ME SPAM!!! I HATE IT!!! I'm sure you do too!
Subscribe to:
Posts (Atom)